
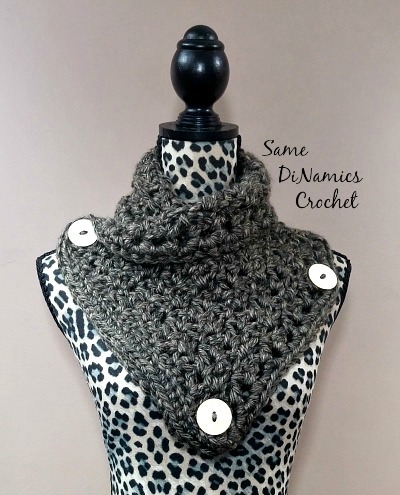
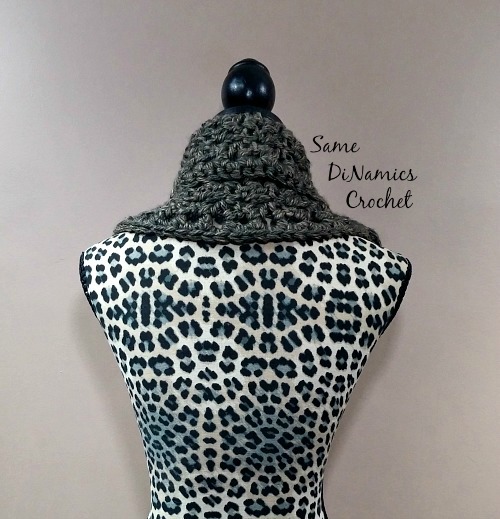
The Aeris Buttoned Cowl will keep your neck toasty and stylish this winter. It’s a splendid cowl that will add a sense of style and elegance to your outfit. It’s a wonderful cowl to wear under a coat that has no hood all the while offering the back of your neck supreme protection against the cold; especially if you have short hair like I do. The “V” pointed shape at the front is achieved by the placement of the buttons. Whether your coat closes all the way to the top or just halfway, the Aeris Buttoned Cowl will look fantastic!
I made this cowl using two different types of yarn, bulky weight and worsted weight, to offer you the autonomy to choose colors and styles to make your very own Aeris Buttoned Cowl.
*Disclaimer: This post contains affiliate links.


I want to thank Stacey of OFF THE HOOK CROCHET CREATIONS BY STACEY for testing this pattern for me.

Aeris Buttoned Cowl – Bulky Yarn Version
Yarn/Hook/Notions
- 3 skeins of Lion Brand Hometown USA, Tweeds, #6 Bulky Weight, 64 yards per skein, 192 yards total
- 9mm hook
- 3 buttons: size 35mm, 1 3/8”; needles for weaving in ends
Size
Cowl measures approximately 32” L x 11” W, width is measured at the center of the cowl
Gauge
Gauge is not important; however this is an approximate gauge – 5 V-St rows = 4”
Experience Level
Easy
Stitch Abbreviation
Ch – chain; st(s) – stitch(es); sk – skip; sp(s) – space(s); sl st – slip stitch; sc – single crochet; dc – double crochet; V-st – v-stitch (see special stitches used)
Special Stitches Used:
FSC – foundation single crochet: ch2, (does not count as st), insert hook into first ch, yo, pull up loop (2 loops on hook), yo, pull through one loop (2 loops on hook), yo, pull through both loops, one FSC made.
V-st – dc, ch1, dc in indicated stitch or space
Pattern Notes:
- Ch4 will count as a dc and ch1, the beginning of a V-st.
- When turning, do not chain up, simply turn and sl st into the ch1 space to begin the V-st, which is the Ch4.
- Mark the FSC as the right side of the cowl.
Pattern Instructions
FSC – 31, turn
Row 1: ch4, dc in same st, [sk2 sts, sc in next, sk2 sts, V-st in next] 5x, turn < 6 V-st; 5 sc>
Row 2: sl st to ch1 sp, ch4, dc in same ch1 sp, [sc in next sc, V-st in next V-st] 5x, turn <6 V-sts; 5 sc>
Rows 3-37: Repeat row 2
Row 38: ch1, 1 sc in same st, 1 sc in each st across <23 sc>. DO NOT FASTEN OFF.
Move on to finishing.
Finishing
You will now work evenly spaced sc stitches around the cowl. I placed 2 sc in each post of the dc sts on both sides; and placed 1 sc in each st in the bottom (the initial FSC). As long as you have an even look to the border of the cowl, the stitch border count is not relevant.
To add buttons, lay the cowl flat with the right side up (the FSC is considered the bottom of the cowl; and the top of the cowl is where you fastened off) and place marker at each top corner of the cowl. Measure 10” from the top right corner and place marker. This will allow you to know where to attach the buttons. Once you have done that, you can now attach your buttons. Attaching the buttons is sort of tricky because there are holes created by the sc border. Try to find a spot where you can safely attach the buttons.
See pictures at the end for more clarifications. Note: Picture of button placement will be the same for both the bulky and worsted weight versions. It’s just for clarification purposes on where to place the buttons.
Aeris Buttoned Cowl – Worsted Weight Version
Yarn/Hook/Notions
- 192 yards of Red Heart with Love, Solids, #4 Worsted Weight (about ½ of a skein)
- J/6mm hook
- 3 buttons: size 25mm/1”; needles for weaving in ends
Size
Cowl measures approximately 30” L x 9” W, width is measured at the center of the cowl
Gauge
Gauge is not important; however this is an approximate gauge – 8 V-st rows = 4”
Experience Level
Easy
Stitch Abbreviation
Ch – chain; st(s) – stitch(es); sk – skip; sp(s) – space(s); sl st – slip stitch; sc – single crochet; dc – double crochet; V-st – v-stitch (see special stitches used)
Special Stitches Used:
FSC – foundation single crochet: ch2, (does not count as st), insert hook into first ch, yo, pull up loop (2 loops on hook), yo, pull through one loop (2 loops on hook), yo, pull through both loops, one FSC made.
V-st – dc, ch1, dc in indicated stitch or space
Pattern Notes:
- Ch4 will count as a dc and ch1, the beginning of a V-st.
- When turning, do not chain up, simply turn and sl st into the ch1 space to begin the V-st, which is the Ch4.
- Mark the FSC as the right side of the cowl.
Pattern Instructions
FSC – 43, turn
Row 1: ch4, dc in same st, [sk2 sts, sc in next, sk2 sts, V-st in next] 7x, turn < 8 V-st; 7 sc>
Row 2: sl st to ch1 sp, ch4, dc in same ch1 sp, [sc in next sc, V-st in next V-st] 7x, turn <8 V-sts; 7 sc>
Rows 3-60: Repeat row
Row 61: ch1, 1 sc in same st, 1 sc in each st across <31 sc>. DO NOT FASTEN OFF.
Move on to finishing.
Finishing
You will now work evenly spaced sc stitches around the cowl. I placed 2 sc in each post of the dc sts on both sides; and placed 1 sc in each st in the bottom (the initial FSC). As long as you have an even look to the border of the cowl, the stitch border count is not relevant.
Photo Tutorial Section
To add buttons, lay the cowl flat with the right side up (the FSC is considered the bottom of the cowl; and the top of the cowl is where you fastened off) and place marker at each top corner of the cowl. Measure 10” from the top right corner and place marker. This will allow you to know where to attach the buttons. Once you have done that, you can now attach your buttons. Attaching the buttons is sort of tricky because there are holes created by the sc border. Try to find a spot where you can safely attach the buttons. While I do give you a set of measurements, the important thing to remember is that you place your marker/buttons where it is comfortable for you. This is just a guide.

This pic shows where to place your markers for the buttons. You can play around with it by sizing it to you. This is just a guide.

Where buttons go.


Copyright © 2016 Same DiNamics Crochet
diannevhunt@gmail.com
Same DiNamics Crochet
This pattern is to not be redistributed or sold.
The finished item may be sold or given away as a gift.

