Thursday Crochet Tip… Foundation Chains

Recently, I asked in my Facebook Same DiNamics Crochet page what sort of tips you’d like to see. The feedback I got was How to make the foundation chain. I set about researching for videos on how to make the foundation chain and I found several great videos on Moogly blog. I also found a fantastic picture tutorial with written instructions on Cre8tion Crochet.

Thursday Crochet Tip Foundation Chains

But, before we get into the tutorials, let’s talk about why or when should you use the foundation chain, and what are they. There are three types of foundation chains, they are: the foundation single crochet (FSC); the foundation half double crochet (FHDC); and, the foundation double crochet (FDC). These stitches are sometimes considered advanced stitches but you shouldn’t let that deter you from learning how to crochet them.

So what are these foundation chains? Well, a foundation chain is just a different way of starting a crochet project that is worked in rows, or round when you join your foundation chain. It is basically your chain and stitch built into one. You create your chain and your stitch while working on the beginning, or so aptly named – foundation, chain of your project. I think that once you grasp the concept of working TWO stitches (the chain is a stitch) at the same time, you will be able to a crochet the foundation chain. It may take a couple of tries to get the hang of it, but, isn’t that how we all learned how to crochet? You practice until you get it.

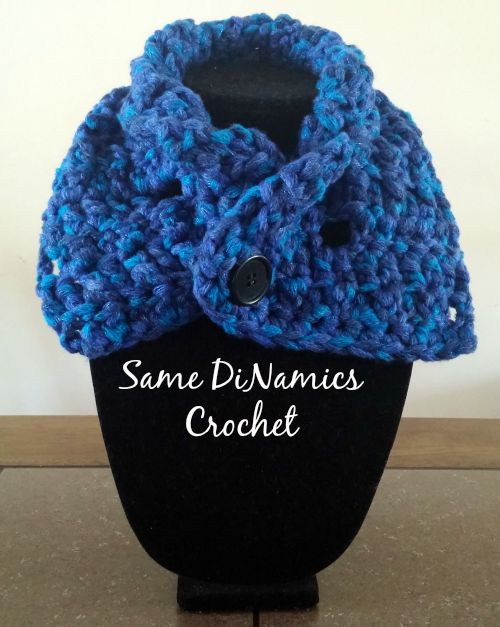
Why or when should you use a foundation chain to start your project? Have you ever worked a beautiful cowl that when you put it on, one edge was tight with no give, while the other edge was nice and stretchy? Yes?  Well, the edge that was tight with no give is the edge you started your project with, your basic chain where you chained X amount of chains. Unfortunately, there’s really no way of getting around this. Yes, you can crochet your beginning chain loosely but that may affect your whole gauge and the finished size of your project. By incorporating a foundation chain into your project at the beginning you are ensuring that you have a piece that stretches nicely and evenly.

Oh wait, there’s also another reason why you should use a foundation chain, it creates a even stitch. When you look at the bottom of your foundation chain, you will see a nice V that has been created giving your piece a flawless look. Also, if you are working on a piece that you need to finish by crocheting an edge, finding where you hook goes is pretty easy with the foundation chain. And, there’s no tell tale sign that that is where you started your piece from.

Well, let’s get on to the videos and picture tutorials. I will provide the links here where you can find the tutorials that will help.

The Foundation Single Crochet (FSC) video tutorial from Moogly Blog.

The Foundation Half Double Crochet (FHDC) video tutorial from Moogly Blog.

The Foundation Double Crochet (FDC) video tutorial from Moogly Blog.

The Foundation Double Crochet (FDC) picture tutorial from Cre8tion Crochet.

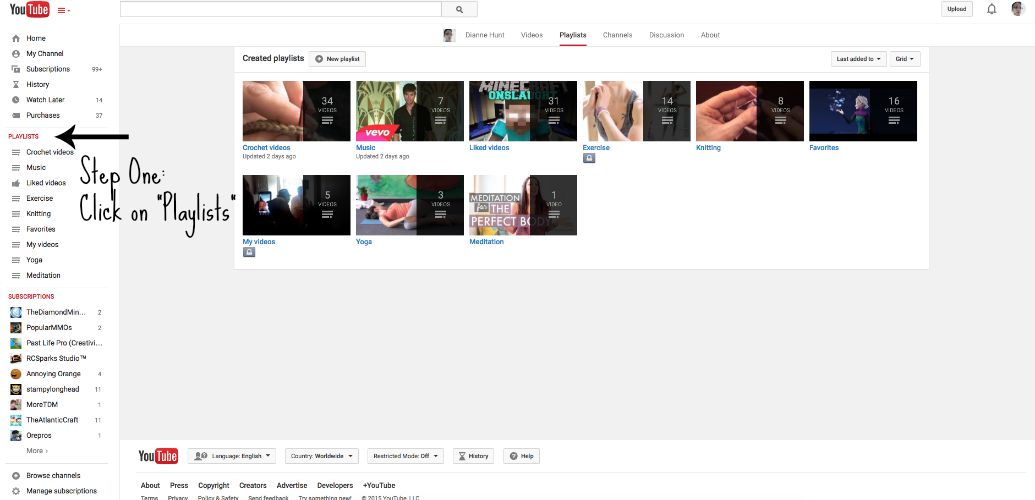
I will encourage you to go on YouTube and search for other video tutorials, if these don’t work for you. Don’t give up on the foundation chain. It’s a whole new world of crocheting once you get the hang  of it. And, don’t forget to add them to your YouTube playlist that you learned how to create in last week’s Thursday Crochet Tip post. See what I did there. 😉

I hope this has helped. Let me know what more tips I can bring.

As always, much love and happy hooking,

Dianne

Thursday Crochet Tip… on Monday – YouTube Playlist

Hi there! Here’s another installment of Thursday Crochet Tip on Same DiNamics Crochet, but, there’s a twist – cause I gotta keep things exciting – the tip is being brought to you on MONDAY!

I was too excited about this tip and needed to share this with you sooner rather than later, so on to Monday’s “Thursday Crochet Tip”.

Thursday Crochet Tip Video Playlist


Do you ever find yourself searching YouTube for a specific crochet video tutorial but have to filter through all the ones you don’t quite need? Well, today’s tip, though not quite crochet yet crochet related, is on setting up your YouTube playlist. Why a YouTube playlist? While there are many reasons to set one up, a great reason for a crochet playlist is that you can add your favorite video tutorial to your list for quick and easy access. I have several in my playlist because it saves time. When I go looking for a new video tutorial and I like it, I immediately add it to my playlist.

There are several ways to add videos to your playlist but first, let’s create a playlist from your desktop. You will need to be signed in to your YouTube account in order to create a playlist.

Option A – Create a playlist first then add videos.  

Once you are signed in to your YouTube account, click on Playlists.

YouTube Playlists Step One


You will then click on “+New Playlist” and name it.

YouTube Playlist Step Two


And voila! You have created your playlist. You can now begin searching for videos and adding it to your playlist.

YouTube Playlist Playlist Created


Option B – Search for video first


Another option to creating a playlist is by searching for a video tutorial first, then creating your playlist.

Search for a video tutorial first, select that video, then click “+Add”.

YouTube Playlist Step One Option B


You can now create a new playlist and name it. You will also be able to make your playlist Public, Unlisted or Private, whichever you decide.

YouTube Playlist Listing


And there it is! You have created your crochet video playlist.

As you can see, you have two options of creating your video playlist from your desktop. Once it is created, let the video adding begin. You can curate any videos you want by category for easier referencing. The possibilities are vast.

If you’re mobile, you can even add a video to your playlist as well.

YouTube Playlist Mobile


As you can see, I just have a playlist of “Crochet Videos”. I haven’t gotten into breaking into different categories but once I have some time, I will be doing so. I find myself looking at more than one video, for a specific topic, to understand how something is done. How will you curate your video playlist?

I hope that you have found this crochet tip useful. If you have any questions, let me know!

As always… much love and happy hooking!

Dianne


Thursday Crochet Tip – Hook Storage

Every few Thursdays, I’ll be bringing to you a new crochet tip for you to use. Be it from crocheting to designing, and hopefully, everything in between.

Some of these will be tips that I’ve tried and have worked for me. It’s only fair that I share what successes I’ve had. Some other tips will be tried and true tips by crocheters all around that I’ve picked up along the way.

Thursday Crochet Tip Hook Storage

To kick this Thursday tip off, I bring to you a handy dandy hook storage tip: using an empty plastic container that is tall enough to store your hooks.

You can re-use (see how you are incorporating the three R’s of reduce, re-use and recycle in your crocheting?) an empty plastic container, cleaned out of course, that is tall and wide enough to store your hooks. I use an empty Dole Shakers (Note: I’m not promoting Dole, just sharing where I go the container from.) container. It’s just tall enough to store my hooks. I don’t have many hooks so it works out for me.


Plastic Storage Container For Hooks


In the past I used a glass jar but it was rather noisy and I was afraid it would shatter. With the plastic one, it’s not as noisy and I can toss it in my project bag if I need to grab it quickly and don’t have time to rummage for a specific hook. It also seals well when the cap is screwed on so there’s no risk of my hooks falling out. Also, it’s slender enough that it doesn’t take up as much space where ever I have it. It’s a rather inexpensive method to use and one that I will keep as long as it can last.

What method do you use to store your hooks? What hook storage tips can you share?

As always… much love and happy hooking,

Dianne

Izzy Neck Warmer Free Crochet Pattern

This neck warmer was inspired by a fictional book character named Izzy of the Chronicles of Izzy series by Michelle Graves. I love that series and that character, she is such an incredible woman who seriously kicks butt.

I have to add that this neck warmer was originally designed as part of a book release giveaway that was for the first book release of the Chronicles of Izzy, See How She Runs. The author asked for a original piece. This design is what I came up with. I was not paid for the design, as this was a donation on my part.

This is an incredibly simple and easy neck warmer that you can whip up in a matter of just an hour or two. It sits comfortably close to your neck and buttons up for closure. With the use of Red Heart Boutique Twilight in Lapis, the neck warmer feels soft against your skin and will provide great warmth on a blistery cold day or evening.

Izzy Neckwarmer on stand

Add Me to Your Ravelry Favorites Button

Pin me for later button

Want a PDF print version of this pattern? You can now get it for a small fee. Why a fee? While I want to provide as many free patterns for you as possible (I will have some paid patterns here and there), I’d also like to monetize my blog (I’m being honest here) and thus creating a small income for myself so that I can continue providing more free patterns.


Izzy Neck warmer

Yarn Used and Suggested:
Red Heart Boutique Twilight, #6 Super Bulky, 3.5 oz/100g, 59 yds/54m, 61% acrylic/25% nylon/9% polyester/5% metallic
Most #6 Super Bulky should work

Hook: 9mm

Notions and other materials:
Needle for weaving in ends
2″ Button – need one

Gauge:
2 rows of dc = 2”
4 dc sts = 2”

Finished Size:

22″ x 7″

Abbreviation of stitches used (US):
ch – chain; st(s) – stitch(es); sc – single crochet; dc – double crochet; FLO – front loop only; BLO – back loop only; sk – skip; rep – repeat; sp- space

Special Stitch Used:
No special stitches used

Notes:
Ch3 counts as a dc.
Ch1 counts as a sc.
The last dc is always made in both loops of your last stitch which is the turning chain from previous row.You may use more than one button and place it where you feel it fits best.

Please feel free to email me at diannevhunt@gmail.com with any questions.
Pattern:

Ch 16

Row 1: 1dc in 4th ch from hook, 1dc in each stitch across, turn, <14 dc>
Rows 2 – 3: ch3, *1dc in FLO, 1dc in BLO*, rep from * to * from 12x, 1dc in last st, turn, <14dc>
Row 4: ch3, 1dc in next 5 sts, ch2, sk 2 sts, 1dc in next 6 sts, turn, <12dc, 1 ch2 sp>
Row 5: ch3, 1dc in next 5 sts, 2dc in ch2 sp, 1dc in next 6 sts, turn <14dc>
Row 6 -7: Rep rows 2 and 3
Row 8: Rep row 4
Rows 9 – 20: Rep rows 5 – 8
Row 21: ch3, *1dc in FLO, 1dc in BLO*, rep from * to * 12x, 1dc in last st, turn, <14dc>
Row 22: ch1, 1sc in each st across, 14sc

Finish off and weave in ends.

Attach button to the center of the first dc row of the neck warmer.

Now, all you have to do is wear your neck warmer. 🙂

print a pdf copy of the pattern for a $1 Fee. You will receive a pdf copy via email from me. 

You can now print a copy of this pattern for your pattern library for a minimal fee of $1. Once you pay via PayPal, you will receive a PDF copy via email. Why a fee? While I want to provide as many free patterns for you as possible (I will have some paid patterns here and there), I’d also like to monetize my blog (I’m being honest here) and thus creating a small income for myself so that I can continue providing more free patterns.


Izzy Neckwarmer Worn

*DISCLAIMER* This post contains an Amazon link to where the book, the Chronicles of Izzy that inspired the neck warmer, can be purchased. It was not commissioned by the author.